
Saildrive rubber gaskets should be replaced every 7 years according to Volvo and involves a fair amount of work to remove the whole saildrive. Derek Gardner has written an excellent article about how he replaced the gasket on his Maxi 1000 which you can find further below.
First, thanks also to Bob Garrett for giving us his own experience…
“I bought a Maxi 1000 last autumn which was due to have the gasket replaced this year. As I was having the prop replaced with a folding one I decided to get the two jobs done together before the boat went back in the water this spring.
I got quotes from a Volvo dealer as well as a couple of general “marine engineers”. Interestingly the Volvo dealer quote was the most precise and detailed as well as seeming to be the cheapest. The others seemed uncertain what they might be taking on. It was necessary to remove the engine completely into the cabin as there was not enough room to lift it enough to replace the part. So it was a big job but they did it well and also provided some extra advice e.g. the back of the water pump was leaking slightly and they suggested I should have a seawater filter to reduce the risk of blockage and reduce the grit getting through that might have worn the pump.
So they did a good job but it was a big job and expensive!” May 2006
Sailing Today also had a well illustrated 4 page article in Dec 2003 covering Volvo 120 saildrive servicing.
——————-
Replacing the Saildrive Diaphragm on Maxi 1000, “Killara 2”
Volvo advise replacement of the Saildrive gaiter every 7 years and Killara 2 has just had her 12th birthday so I thought it was high time to look at replacing it.
 There are some articles on how to do the nut and bolts work (Sailing Today & Practical Boat Owner) and the instructions supplied with the kit are fairly comprehensive, so this article deals with the specific tasks related to doing the job on a Maxi 1000.
To undertake the work you must be confident that your mechanical skills are above average. You will need to be confident enough to split the engine from the gearbox and split the gearbox from the leg and re-build it all back again using a torque wrench. Don’t forget that you will not be able to test you have completed the job satisfactorily until you get the boat back in the water and there are no leaks!
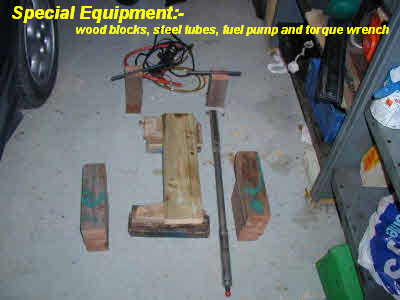
Preparation is the key to completing the work on a timely basis. You will need an assortment of wood blocks and some thin ply shims as you will need to support the gearbox and the engine separately, so that when you split the leg from the engine neither components drop away. Also you will need a torque wrench that you can set from 15 to 40 Nm, a 12 volt fuel pump and fuel containers as well as a good set of metric spanners and sockets including an 8mm hex socket to torque the leg to gearbox bolts. Also essential are two 12mm diameter steel rods approx 22cms long. Take your wood working tools to saw up blocks to fit in.
 You will need to order a diaphragm kit, an external fairing gaiter and good quality contact adhesive. You will also need the special Permatex sealant (I have most of a tube going cheap!). I decided to also change the gearbox output shaft water/oil seals at the bottom of the leg and the leg sea cock whilst it was all in bits. Also at the same time I changed the fuel filters.
Do disconnect the batteries before you start anything!
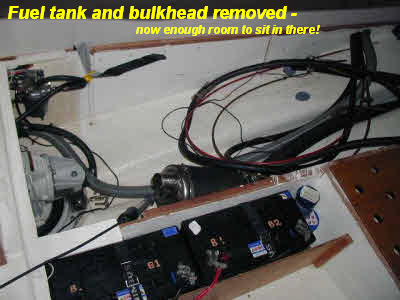
Space is very limited in the aft cabin to be able to lift the leg and gearbox into the inside of the boat, so I decided to remove the fuel tank first, to give me some crouching room to work on everything. Pump the fuel out of the diesel tank (I removed it through the fuel gauge sender hole) into containers and store them well out of the way. It is also a good opportunity to clean the tank completely out to get rid of the dirt deposits that seem to build up inside. I took mine home and pressure washed it inside and out and then 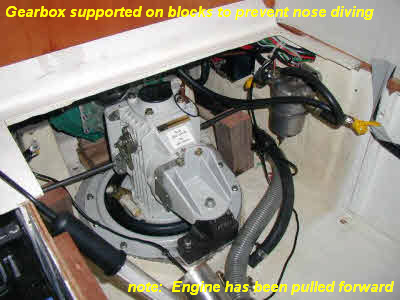 stood it on the central heating boiler to dry out! To remove the tank you will need to go in the stbd locker and remove the rear floor panel to access the tank rear bolt. With the tank out of the way you can start to disconnect the exhaust, gear linkage cable, throttle cable and any calorifier pipes, after first draining out the cooling system! These all go through the small wooden bulkhead to the rear of the gearbox. This bulkhead will need to come out next. This is screwed in and will come out vertically after sawing off a small piece of the horizontal bunk support (this can be refitted with screws later) You now have enough space to sit where the fuel tank was and work on the leg.
As the engine will need to be pulled forward about 15 cms you will need to disconnect wires and pipes likely to be affected – take a picture or two before you start (I did not) so you can get the routing the same when you put it all back! Blocks need to go in the well under the engine sump and in the well in front of the sump as you need to bridge the two with a plank under the engine sump that is snug so that when it is all disconnected the rear of the engine does not drop down. I built up blocks to be level with and in front of the engine mounts so that when the engine was slid forwards the mounts just 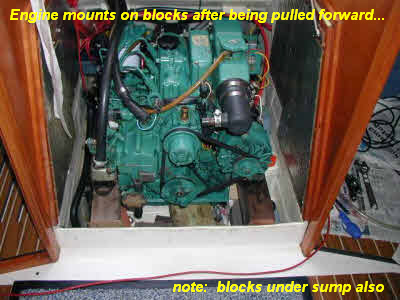 slid onto the blocks. So now you are ready at the front. Back to the aft cabin and the bent back, you should be able to locate two 12mm holes in the sides of the gearbox and push in the steel rods and then pack them up with wood blocks to support the front of the gearbox (I used 3 x 3 fence posts cut off to length for most of my blocks). Now both the engine and gearbox are independently supported on blocks, you can undo the engine mounts, the bolts holding the gearbox to the engine and slowly pull the engine forwards approx 15 cms. Check all the wires and bits are disconnected! Nothing should drop down if your support blocks are all in place correctly.
Assuming that you previously have removed the propeller and drained the leg oil, you can now remove bolts holding the outer diaphragm ring and the rear engine support. Preferably with a mate on the outside to help take some weight, the leg complete with the rubber diaphragm can now be lifted upwards and rearwards. You now realise why you took out the fuel tank!
Replacement of the diaphragm is well covered in the various publications, but I would advise that you do this at home in the workshop. I made up a stand for the assembly and clamped it to my work bench as you do not want to damage the new rubber seal when fitted.
 What did I find after pulling it all out? Well the rubber was definitely quite age hardened compared to the new one and there was some perishing of the rubber (small hairline cracks) though there was no evidence of any leaks.
Replacement is straight forward except it is a good idea to have a mate on the outside again to take some of the weight as you lower in the leg (I did not and struggled a bit)
Getting the engine to mate the splined shaft was without problem and everything else went back OK, This went well because I had made sure that the supports were supporting the engine and gearbox in the correct positions.
However what I believe was better than advised was to put the leg back in using the steel rods and blocks, put on the clamping ring and start the bolts in the holes and loosely put in the rear mount, get the engine all connected back up and loosely replace the engine mount bolts. I then went back under the boat and pushed up the leg to relieve any stress on the rubber diaphragm, before bolting it all down.
How long did it take? Get ALL your equipment together first and I reckon a day and a half to strip it all out. Replacing the gaiter at home will take a couple of evenings by the time you change the seals and paint up the rusty clamping ring and toque the upside down bolts. Then another day and a half by the time you put it all together and fill everything up with fuel and oil and bleed the fuel through and run it all up, checking the gear selection functions OK. I did it all on my own, but to have a mate at times would have been useful, although most of the time there is only room for one person to work around things
How much did it cost? Everything all in I spent £305 +VAT without oil and filters, and this included changing the sea cock and a rear gearbox mounting support that was damaged. The good thing is that I was told that for the Volvo Dealer to do this would be over £1,000 plus VAT
The boat has not been in the water yet so watch this space!
My next project is to drop the rudder as it is now showing signs of lateral float and needs looking at.
If anyone wants more detailed advice you are welcome to give me call to discuss
Derek Gardner – Killara 2 (you can find Derek’s details in your membership list)
18 April 2007