Ancillary Systems
Electrics, instrumentation, mooring, etc.
A Maxi 1000 problem I had last year was when the loo stopped working – I blamed others for blocking it, but found eventually that the holding tank was full of limescale – like the pipes get but this time blocking the internal stainless pipes and 8 – 10 mm thick on the side wall of the tank. I took out the tank and chipped and banged away to get it all out – a job worth doing this winter BEFORE IT BLOCKS if boat is 10 years old+
Also there has been a problem with the new PAR Brydon loos – they deleted a spring behind the inlet valve and many paople are having flushing water priming problems. If they are (as we are), they need to get the spring – this will fix it. They will supply it free!
Derek Gardner Oct 2006
Rob Ware, Eye of Horus adds… “We also had a blocked loo this summer and like Derek I initially blamed the crew. It turned out that limescale (up to 8 mm thick) in the hose between the loo and the holding tank had become dislodged and totally blocked the pipe. I ended up replacing the pipe. It is probably worth checking the internal condition of the pipe every couple of years.”
Chris Wildey adds… “I used RydLyme Marine earlier this year when I was getting worried about pipe blockage. It seems to have worked, and there is certainly no limescale in the tank itself after 5 years. It would be interesting to know how others have got on with this or other solutions. www.rydlymemarine.co.uk
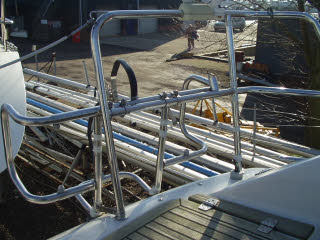
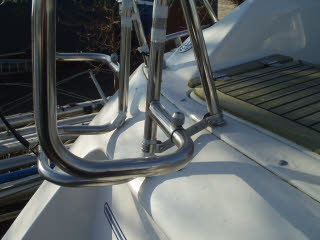
 Richard provided these photos in response to a request from Bob Garrett.
“Bob, I’ve fitted a liferaft to Thor, hanging it off the pulpit. I’m really pleased with it as I mounted it in a way that distributes the load down the pushpit rather than hanging off as many do. The pictures say it all – if not, shout and I’ll take some more. The bracket on the inboard side is a sort of meccano-looking dinghy chain-plate I got from the chandler. I used a piece of rubber hose taped to the tubing to rest on the transom. I’m sure you can work out the rest. The good thing is that you can rest the liferaft on the cradle without the retaining strap and the flagpole still fits.”
Richard Davidson, Thor
We adopted an alternative solution on our Maxi 1100. We’ve strapped a cheap B&Q domestic dehumidifier to a backing sheet which is mounted under the starboard flap of the saloon table. It’s mounted a couple of inches above the floor so you don’t lose too much space for feet, and a permanent drain is made very neatly via plastic tubing into the bilge by the float switch. It’s run via a time clock every few days when we’re not on board. When we are, we can always run overnight to help keep the inside sweet and dry.
Obviously you can’t lower the flap with it in place but it can be quickly and easily removed with just two small neat screws underneath the table.
We wouldn’t recommend running it when stored ashore as I prefer to keep the bilge dry in case it freezes. In fact, what we do is to lash it over the sink so that the condensate can drain directly out – but be sure to leave the sink seacock open. Even cheap dehumidifiers can be bought that have a frost setting that ensures there is no ice build-up.
Vouvray
Sometimes the hob burners won’t stay lit when the knob is released:
Solution: Hold the knob in, light the gas and after waiting 5 seconds for the flame sensor to heat up, let the knob out about 1 mm (1/16″) and then press the knob back in sharply, then release the knob.
The oven and grill won’t stay lit when the knob is released.
If you have a cooker with metal knobs the oven/grill knob may be fixed too far in on the shaft preventing the flame detection mechanism from engaging. Solution is to loosen the knob retaining screw (using an allen key) and move the knob back on the shaft, then tighten the screw. You should have the same or slightly larger gap between the knob and cooker as that for the burner knobs.
Taranaki
I have fitted a fused mini siren with an on/off switch to the + & – wiring of my automatic bilge pump. To my thoughts, the auto bilge should not normally run under normal circumstances. And if it does while sailing or motoring, it probably won’t be heard. With the siren wired in, it will give you an early warning of water being where it shouldn’t be.
Barry Powling ‘Khamsin’
